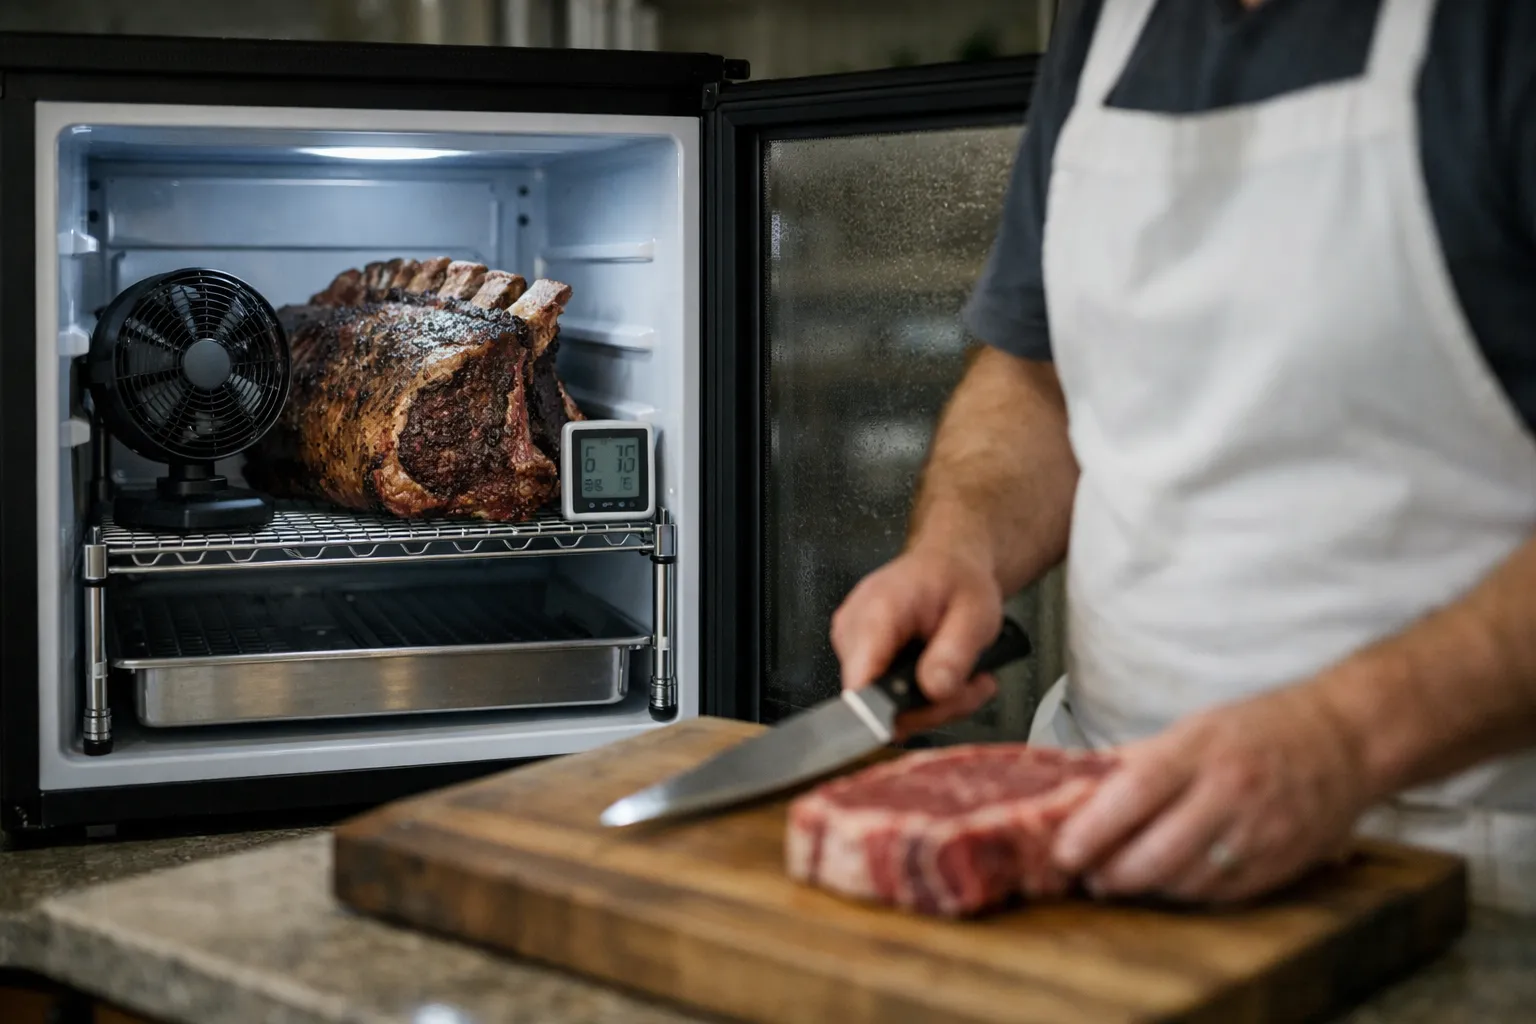
Introduction
What you'll learn: updated, practical steps to dry‑age whole‑muscle beef at home in October 2026; which cuts to choose; how to set and verify temperature, relative humidity (RH) and airflow; recent consumer‑grade equipment and monitoring options; and how to trim, portion and cook the finished product. Who this is for: home cooks and food enthusiasts who want repeatable, restaurant‑level dry‑aged beef without unnecessary risk or wasted product. Why it matters now: consumer dry‑aging technology and monitoring tools advanced through 2024–2026, making consistent home results more achievable — but the food‑safety fundamentals still govern what’s safe and what isn’t.
Prerequisites / Context
Before you begin, be clear about three practical requirements:
- Dedicated space and time: You need a dedicated refrigerator or cabinet (or a proven bag workflow) reserved for aging, and time: typical aging runs are 14–60+ days. Plan around family use and kitchen constraints.
- Butchery, sanitation and gear: Basic boning skills and food‑safe cleaning procedures are necessary. Expect to invest in at least one reliable thermometer/hygrometer, a sharp boning knife, stainless racks and drip trays.
- Regulatory limits: Home‑aged meat for personal consumption is allowed in most U.S. jurisdictions; selling dry‑aged meat requires processing in an inspected facility (check USDA/FSIS or your state inspector for specifics).
Step 1 — Choose the right cut
- Buy whole primals or subprimals: bone‑in rib (prime rib roast), strip loin (NY strip), or large sirloin or short‑loin subprimals. Aim for 8–20 lb pieces; larger pieces dry more slowly and retain interior moisture better.
- Select higher marbling for best results: USDA Prime or high Choice produce the most forgiving results; Choice works well but leaner muscles show trim loss more quickly.
- Purchase from inspected, traceable sources: a reputable butcher or retailer that can tell you fabrication and packing dates. Fresher starting meat produces more predictable aging and reduces uncertainty about microbial history.
Step 2 — Bagged vs bagless: choose your workflow
Two practical approaches remain current in 2026:
- Bagless (traditional) dry‑aging: Exposes the roast to controlled air to form the characteristic crust and allow moisture loss. Requires a dedicated cabinet or converted fridge with reliable RH and airflow control.
- Permeable dry‑aging bags: Modern permeable membranes let moisture escape while shielding the surface from direct contamination; they reduce trim loss and make aging in a regular fridge feasible. By 2026, several brands offer thicker, multi‑use membranes and higher‑clarity bags tailored to home cooks.
Which to choose: if you want the classic exposed crust and are comfortable managing a dedicated cabinet, bagless will deliver the traditional surface character. If you prefer lower trim loss, simpler workflows and staging in a main fridge or spare unit, use a high‑quality permeable bag and follow the manufacturer’s handling instructions.
Step 3 — Equipment and 2026‑era technology
The core variables remain the same: temperature, RH and airflow. What changed in 2024–2026 is accessible, affordable monitoring and smarter controllers:
- Dedicated enclosure: Convert a spare refrigerator or buy a consumer dry‑aging cabinet. In 2024–2026 more consumer models shipped with built‑in RH control and app integration; if you buy one, verify it supports the core window below and allows independent sensor placement.
- Temperature control: Maintain 34–38°F (1–3°C). Use an external temperature controller or a cabinet with a reliable internal controller. Place at least two sensors: one at meat level close to the roast and one in the air stream opposite the fan. In 2026, Wi‑Fi loggers and cloud alerts are standard; configure alerts for deviations >2°F.
- Humidity control: Target 75–85% RH (≈80% is a practical midpoint for many bagless setups). Small, purpose‑built humidifier/dehumidifier modules for mini‑fridges are now commercially available and more precise than passive trays. If you use a permeable bag, RH control is less critical but still helpful for consistent results.
- Airflow: Gentle, continuous circulation prevents dead zones. Low‑speed computer fans or variable‑speed inline fans are typical; in 2026 several controllers offer PID or model‑predictive control to modulate fan speed and maintain RH without over‑drying.
- Monitoring and redundancy: Use two independent measurement systems: a local display and a remote logger/app. Log at 5–15 minute intervals for trend analysis and historical batch records. Export logs to CSV for comparison between batches.
- Sanitation: Stainless racks, removable drip trays, and food‑grade sanitizers. Calibrate temperature probes seasonally against a reference thermometer (many retailers now offer NIST‑traceable calibration certificates online for common loggers).
- Optional 2026 additions: Integrated cabinet sanitizing cycles, UV‑LED interior lights (used only between batches), and sensor fusion features in some controllers that combine temp, RH and surface‑dryness heuristics to recommend finishing windows.
Step 4 — Install and precondition the cabinet
- Clean and sanitize thoroughly: remove shelves, scrub surfaces with a food‑grade sanitizer and rinse. Let dry completely.
- Install sensors at meat level and opposite the fan to measure both the product microclimate and air stream. Avoid placing sensors against metal surfaces where readings can be skewed.
- Position the fan and humidification/dehumidification device. Where possible, route airflow to pass across the meat without creating strong gusts that can over‑dry edges.
- Precondition for 24–72 hours and verify stable readings: temperature in the 34–38°F window and RH ≈75–85% (if bagless). Confirm controller alerts are set (e.g., temp ±2°F, RH ±7%). Record baseline logs for at least 48 hours so you have a pre‑load signature to compare after loading meat.
Step 5 — Prepare and load the roast
- Do not salt or season the roast before aging — aging should start on unseasoned, intact muscle.
- Leave bones and the fat cap intact; they protect the interior and contribute flavor. Trim only obvious damaged surface pieces before loading.
- Place the roast on a stainless wire rack with a drip tray beneath; ensure air can circulate around all sides. Space multiple roasts apart to avoid microclimate overlap.
- If using a permeable bag, follow the bag manufacturer’s instructions for sealing and air removal; set the bagged roast on the rack (not on the tray) to allow drainage and airflow around the bag.
Step 6 — Temperature, humidity and timing (practical targets)
These targets are grounded in food‑safety standards and enzymology:
- Temperature: 34–38°F (1–3°C)
- Relative humidity: 75–85% (≈80% for bagless; slightly higher in some bagged workflows)
- Airflow: Gentle, steady circulation — think measured CFM equivalent to a small computer fan, not continuous high flow.
Typical aging windows and their practical effects:
- 14–21 days: Noticeable tenderness improvement and early flavor concentration. Low trim loss and good value for first experiments.
- 28–45 days: Classic dry‑aged profile with nutty, beefy aromatics and more pronounced umami.
- 45–90+ days: Intense concentration and funk for aficionados; trim loss rises and effective cost per usable pound increases substantially. Most home cooks choose up to 60 days for balance.
Yield expectations (approximate): expect ~10–20% loss at 21 days, ~18–30% at 28–45 days and higher at 60+ days; actual yields depend on cut, starting fat and airflow.
Step 7 — Monitoring and troubleshooting (updated 2026 workflows)
- Daily quick checks: Confirm temp and RH and ensure fans and humidifiers are operating. Rely on remote alerts for out‑of‑hours exceptions but inspect the surface daily when practical.
- Mold inspection: Dry, white or gray velvety growths are common on bagless surfaces and can be trimmed away. Colored (green, black, pink) molds, sliminess or a strong ammonia/putrid odor are red flags — discard the roast. When in doubt, err on the side of safety.
- Condensation: Water droplets on meat are undesirable. If you observe condensation, slightly reduce RH or increase gentle airflow until surfaces remain matte‑dry between checks.
- Temperature excursions: If cabinet temp rises above 40°F (4°C) for several hours, evaluate safety — prolonged warm periods increase risk of pathogen growth. Modern controllers can dispatch alerts and, for some units, attempt corrective actions such as boosting compressor cycles.
- Recordkeeping: In 2026 many hobbyists keep a simple spreadsheet or use cabinet‑supplied batch logs: start date, starting weight, temp/RH profile, finish date and final trimmed weight. This data lets you refine timing and predict trim thickness for specific cuts.
Step 8 — Trim, portion and store
- Move the roast to a clean, cool cutting area. Keep tools sanitary and use a meat thermometer and a sharp boning knife.
- Trim the desiccated exterior: remove the hard crust (oxidized meat and dry fat) until you reach unoxidized, rosy muscle. On your first run trim conservatively to learn how thick the crust is for your system and chosen aging time.
- Portion into steaks (1.5–2" ribeyes are classic), roasts, or vacuum‑pack for freezing. Vacuum sealing after trimming preserves the product and reduces further oxidation; label vacuum packs with aging date and cook‑by date for freezer rotation.
Cooking dry‑aged steaks
Dry‑aged beef concentrates flavor and browns faster — cook to highlight the interior and the concentrated aromatics:
- Reverse sear: Bring steaks to target internal temp slowly (low oven or sous‑vide), then finish with a high‑heat sear. This method gives even doneness and a controlled crust.
- High‑heat sear: For thinner steaks, preheat a heavy pan or grill and sear quickly; monitor closely to avoid over‑browning. Dry‑aged steaks often need less finishing time than wet‑aged equivalents.
- Seasoning: Minimal: coarse salt and cracked pepper. Salt timing (immediately before sear vs 40–60 minutes prior) affects crust and moisture; try both to see your preference.
Cost, yield and decision checklist (updated context)
Dry‑aging remains a tradeoff: time, equipment and cost versus taste and experience. Example math (adjust for your local prices):
- Purchase: 12 lb bone‑in rib roast at $18/lb → $216 initial cost.
- After 28 days with ~25% loss → ~9 lb usable → effective cost ≈ $24/usable lb (plus energy and equipment amortization).
Why this matters in 2026: beef prices and supply variability since 2020 make trim loss a more consequential expense for home cooks. If you plan to age frequently, investing in a dedicated cabinet and reliable monitoring often improves yield and reduces wasted product.
Common mistakes to avoid
- Using the main household refrigerator for bagless aging—door openings and other foods cause temperature swings and contamination risk.
- Relying on a single sensor—use at least two independent sensors and a remote alerting logger.
- Excessive airflow—too strong a fan dries the crust rapidly and increases trim loss.
- Ignoring off smells or colored molds—these are grounds to discard the roast rather than risk foodborne illness.
- Trimming too aggressively on early attempts—learn your system’s crust thickness before heavy trimming.
Pro tips (advanced, October 2026)
- Keep a batch log: record start date, starting weight, temp/RH profile and final trimmed weight. After several batches you’ll know expected trim thickness and refine timing to your taste.
- Calibrate sensors seasonally: many affordable loggers now offer calibration certificates or calibration kits; use them to keep readings reliable.
- Mix bagged and bagless phases for long aging: some experienced agers use a bag for the first half of a long run to reduce trim loss, then finish unbagged for surface oxidation and aroma development. Test on a small trial piece first.
- Use sous‑vide for thick roasts or to standardize finish temps. Pre‑ or post‑sous‑vide finishing sears preserve interior juiciness while producing a consistent crust.
FAQ
Is dry‑aging safe to do at home?
Yes, when you maintain safe temperatures (34–38°F), control RH appropriately, use clean equipment and monitor conditions with redundancy. Use whole‑muscle cuts only, keep your aging enclosure dedicated and clean between batches, and discard any roast showing colored mold, slime, or strong ammonia/putrid odors.
Can I dry‑age in my regular refrigerator?
You can use a high‑quality permeable dry‑aging bag in a regular fridge, but bagless aging requires a dedicated fridge or cabinet. Household refrigerators are opened frequently and host other foods, increasing temperature fluctuation and cross‑contamination risk for bagless aging.
How do I know if surface mold is safe?
Dry, white or gray surface molds that are velvety and dry are common on exposed dry‑aged beef and can be trimmed away to reveal good muscle beneath. Colored molds (green, black, pink), slimy textures, or strong off‑odors indicate spoilage — discard the roast.
How big a roast should a beginner use?
Start with a 10–14 lb bone‑in rib roast or large strip loin. These sizes dry more slowly and are forgiving for first attempts. Avoid trying to age small individual steaks unbagged — they dry out quickly and are harder to manage.
Do permeable dry‑aging bags change the flavor?
Permeable bags reduce trim loss and contamination while producing a flavor profile that many home cooks find close to traditional bagless aging at common home aging windows (14–45 days). Differences are most noticeable in very long aging runs where surface oxidation contributes additional aromatics.
Bottom line: with disciplined monitoring, a clean workflow and modest investment in sensors and controls, dry‑aging at home in October 2026 is more accessible and reliable than ever. Start with a single roast, keep careful records and adjust RH, airflow and time to match your kitchen, your palate and your budget.