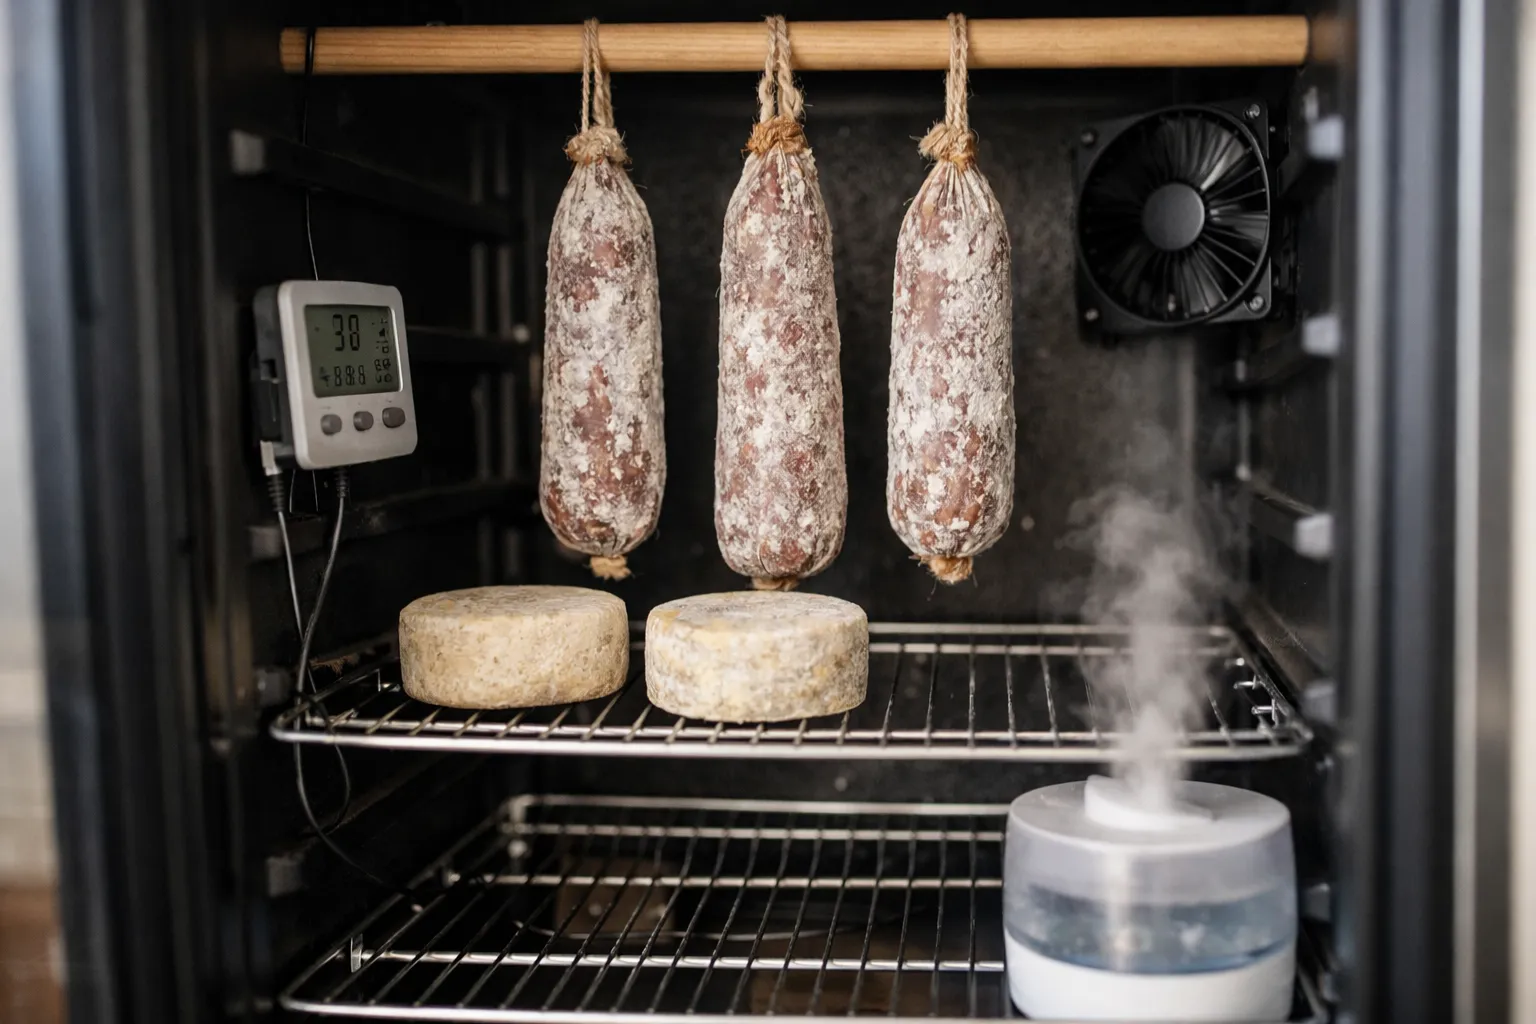
For home cooks and hobbyists who want consistent, repeatable results with salumi and cave-aged cheeses, a compact curing chamber is essential. This updated July 2026 guide explains what to choose, how to build and run a small chamber (roughly wine-fridge to 8 cu ft), and what’s changed since 2024 — including modern controllers, improved sensors, and current best practices for safety, monitoring and energy efficiency.
Who this guide is for and why it matters
This article is written for experienced home cooks and charcuterie/cheesemaking hobbyists who:
- Already follow tested recipes and basic food-safety practices.
- Have limited space and want a chamber under ~8 cubic feet.
- Want reliable control of temperature, relative humidity (RH) and airflow to repeat results.
Why it matters: precise control over temperature, RH and airflow determines microbial dynamics, moisture loss and final flavor. Modern, compact systems let small producers and hobbyists achieve consistent outcomes with lower energy use and better data for troubleshooting.
Prerequisites & context (what to know first)
Before you start:
- Understand microbiology basics: fermentation (pH drop), salt and nitrite dosing, and safe water activity targets. If these topics are new to you, consult university extension materials (e.g., Penn State, UC Davis, University of Wisconsin food science resources) and established charcuterie texts.
- Confirm local regulations before selling or distributing cured meats — most jurisdictions restrict sale of home-cured meats without inspected facilities.
- Have a calibrated digital scale, an accurate thermometer, and a plan for sanitation and traceability (batch labels, start dates, weights).
What’s new in 2026
Key developments since the mid-2020s that change build and operation choices:
- Consumer-grade integrated units: Several manufacturers now sell compact, plug-and-play curing fridges with built-in RH control and app telemetry. They reduce conversion time but cost more than DIY conversions.
- Better, cheaper sensors: Low-cost sensors with ±2% RH accuracy and reliable thermistors are common; choose units with replaceable probes and calibration capability.
- Edge telemetry and open-source logging: Home builders increasingly use ESP32/ESPHome or commercial Wi‑Fi controllers for continuous logging and alerts (temperature/RH graphs, SMS/push notifications), helping catch failures early.
- Energy and emissions focus: Users prefer chest-freezer conversions or modern low-power purpose-built units to reduce energy use. Simple steps like adding thermal mass cut compressor cycles dramatically.
- Food-safety emphasis: More accessible guidance and testing resources are available from university labs and extension services for hobbyists wanting microbial or pH verification.
Legal & safety overview (must-read)
Curing and aging can create food-safety risks. Key, up-to-date points for 2026:
- Home production for personal consumption remains allowed in most places; sale or gifting may be restricted. Confirm local and state rules before selling.
- Use tested recipes and follow manufacturer dosing for curing salts. Example: Prague Powder #1 (commonly used) contains ~6.25% sodium nitrite; typical maximum dosing is 0.25% of meat weight (2.5 g/kg) — about 156 ppm nitrite in product. Always follow the specific curing-salt vendor instructions and recipe limits.
- For fermented sausages, use a commercial starter culture (e.g., Lactobacillus sakei or Pediococcus species) and verify fermentation targets (pH and time). Many hobbyists now use pH strips or a calibrated pH meter to confirm pH decline to recipe targets.
- If you have questions on nitrite dosing, pH targets or water activity (aw), consult extension service resources or recognized charcuterie texts; when in doubt, err on the conservative side or discard suspect product.
Core design decisions — which enclosure to choose
Common compact options and trade-offs (2026 perspective):
- Converted wine fridge / upright fridge: Cheapest and easiest. Built-in shelving and moderate insulation. Stock thermostats often cycle widely; you’ll usually add an external controller or heater to stabilize low ranges in summer.
- Converted chest freezer + external controller: Excellent thermal integrity and energy efficiency. Use an external PID/ON-OFF controller (mechanical or SSR-based) to cycle the compressor. Add a small heater for warm conditions when needed.
- Plug-and-play purpose-built curing units: Newer models include RH control and Wi‑Fi logging. Good for hobbyists who want convenience and warranty coverage. Expect higher price; evaluate energy-use specs.
- Custom cabinet with small HVAC/heat-pump: Flexible for multi-product aging but larger and costlier. Offers broader temperature range if you plan long-term aging projects.
Essential components and why they matter
- Temperature controller — ON/OFF or PID. Look for separate cooling and heating outputs and a probe you can place at product level. PID with SSR yields tighter control and fewer temperature swings.
- Humidity control — ultrasonic or evaporative humidifiers for boosting RH; for dehumidification, use controlled compressor cycling, small dehumidifiers, or desiccant systems. An integrated humidistat simplifies automation.
- Humidity sensor (hygrometer) — digital probe with ±2–3% RH accuracy preferred. Place at mid-chamber, near product, not at the door or near direct airflow.
- Airflow — low-speed fans (computer/brushless) for gentle circulation. Avoid direct, high-velocity air on products to prevent case-hardening.
- Racks and hanging rods — stainless steel or food-safe coated rails. Permit at least 2–4 cm spacing between items for even airflow.
- Monitoring & logging — dual sensors for redundancy. Consider a Wi‑Fi logger with cloud alerts (or local logging if you prefer no cloud). Continuous logs let you spot slow drifts that handheld checks miss.
- Sanitation tools — food-safe sanitizers, nitrile gloves, dedicated thermometers and scales. Clean and dry surfaces; avoid cross-contamination from raw meats to finished products.
Step-by-step build: typical wine-fridge conversion (updated 2026)
- Choose and prep the unit
- Clean thoroughly with food-safe sanitizer. Remove interior plastics that block hanging if needed.
- Inspect seals; replace gasket if brittle. Good seals reduce energy use and condensation issues.
- Install temperature controller
- Mount the probe at product height, away from compressor vents and door seals.
- If using a fridge without low-temperature capability, add a small thermostatic heater (25–60 W) controlled by the same controller to maintain temps when ambient is warm.
- Add humidity control
- Place an ultrasonic humidifier on a drip tray or a water pan with a wick for passive humidification. New compact units with built-in RH control are convenient but still benefit from a small fan to distribute moisture evenly.
- For dehumidification, rely on the compressor cycle in cold conditions, or add a very small desiccant dehumidifier for precise stages; avoid large consumer dehumidifiers that over-dry small chambers.
- Install airflow
- Add a low-RPM circulation fan to move air gently across products—aim for laminar, low-velocity flow (measured empirically by feeling; should not noticeably cool items when running).
- Attach fan to side or back, not pointing directly at pieces.
- Place monitoring devices
- Use at least two independent thermometers/hygrometers. If you use Wi‑Fi logging, verify timestamps and battery backup for outages.
- Calibrate RH sensors using a salt test or manufacturer method before first batch.
- Run a dry run
- Stabilize chamber at target temp and RH for 72 hours, logging data. Check for condensation, door leakage, and stability.
- Tune controller hysteresis to minimize large swings (example: ±0.5–1.0°C hysteresis for temperature; small RH deadband adjustments for humidity).
Target conditions for common products (practical ranges)
Follow recipe-specific guidance; these are common operational targets used by hobbyists and small artisans.
- Fermented salami — fermentation phase: 22–26°C (72–79°F), RH 85–95% for 24–72 hours, until pH reaches the recipe target (commonly ~5.0–5.3).
- Salami — drying/aging phase: 10–15°C (50–59°F), RH 65–80% depending on size and desired crust; many Genoa-style salami aim for 30–40% weight loss.
- Whole-muscle cured hams (short-term): initial drying 12–18°C and 70–80% RH, then long aging ~10–12°C and 60–75% RH for extended time.
- Hard cheeses: 10–13°C (50–55°F), RH 80–90%; adjust depending on rind strategy and style.
- Soft-ripened cheeses (Brie-style): 10–12°C, RH 90–95% early ripening; slightly lower later to control moisture and ammonia production.
Example 30–60 day small salami timeline (practical specifics)
- Mix & stuff: Follow a trusted recipe. Typical formulation example: 2.0–2.4% salt by meat weight; ~1% dextrose for fermentation feed (adjust as recipe directs); starter culture per supplier directions. Use curing salt only as directed and weigh precisely.
- Ferment (24–72 hr): 22–26°C, RH 85–95% until pH target met (use a pH meter or test strips to confirm).
- Dry/Age: Move to chamber at 10–14°C, RH 70–80%. Monitor weight loss weekly; many Genoa-style salami reach target in 30–45 days at 30–40% loss.
- Storage: After target loss, store at 8–12°C and 65–75% RH. Label batch with start date and shrinkage data for future reference.
Mold and rind management — updated best practices
Beneficial white molds (Penicillium nalgiovense) remain the standard protective bloom for salumi. Key 2026 points:
- Commercial white mold inoculants are inexpensive and predictable; they outcompete unwanted molds and reduce risk of toxigenic species.
- Avoid relying on ambient inoculation in new chambers — predictable inoculation reduces early failures.
- Reject any products with fuzzy green, black, red, or slimy growth, strong ammonia or putrid odors. These indicate contamination and possible mycotoxin risk.
Common problems and fixes
- Case-hardening (too-dry surface): Raise RH, reduce fan speed, or loosely wrap during the first days to slow surface drying.
- Sticky/sweaty surface: RH too high for temperature. Lower RH incrementally or add gentle airflow while avoiding direct blasts on products.
- No white mold bloom: Increase RH briefly and consider direct inoculation on future batches.
- Off-odors after fermentation: Measure pH. If fermentation did not reach required pH, discard. Investigate starter viability, sugar dosing and fermentation temperature.
- Sensor drift: Recalibrate hygrometers regularly; keep a spare calibrated device for cross-checks.
Pro Tips (advanced, practical)
- Use thermal mass (a 2–5 L water jug) to reduce rapid temperature swings in small chambers. Water stores heat and stabilizes compressor cycles.
- Log continuously for at least the first three batches. Patterns in weight loss and chamber logs reveal whether changes come from recipe, ambient conditions, or chamber behavior.
- Consider a small SSR-driven heater for micro-adjustments instead of cycling entire compressors; it gives smoother temperature control.
- For multi-style aging, set up two zones or move products between phases; a single chamber rarely suits both active fermentation and long, cool aging simultaneously.
- When using Wi‑Fi loggers, add a local backup (SD card) for continuity during internet outages.
Final checklist before first batch
- Chamber stabilized at target temp & RH for 72 hours with logged data.
- At least two independent thermometers/hygrometers installed and calibrated.
- Fans and humidification tested for quiet, vibration-free operation.
- Sanitation plan and dedicated tools ready.
- Followed a tested recipe; cured salts weighed and recorded per manufacturer dosing.
Resources and next steps
Before attempting extended or high-risk cures, consult university extension publications (Penn State, UC Davis, University of Wisconsin), recognized charcuterie texts, and curing-salt manufacturers’ documentation. Consider a short course or a mentor from a local charcutier or cheesemaker if you plan to scale production.
Start small (one or two salami or a single-wheel cheese) and use data (weight-loss curves, chamber logs, pH readings) to tune your setup. Good record-keeping accelerates learning and helps avoid repeat mistakes.
Common mistakes to avoid
- Relying on a single sensor. Dual sensors catch drift and failure.
- Using imprecise scales or eyeballing curing salts. Always weigh and record doses.
- Expecting one chamber to do everything well without staging products through phases.
- Neglecting airflow design—either too strong (case-hardening) or too weak (stagnation, uneven mold growth).
FAQ: Can I sell cured meats made at home?
Rules vary by jurisdiction. In most U.S. states, sale of home-cured meats requires inspected commercial facilities. Some “cottage food” laws allow baked goods and low-risk foods but exclude cured meats. Confirm state and local health department rules before selling.
FAQ: How precise must my humidity and temperature be?
Precision matters more for stability than absolute point values. Aim for ±1–2°C temperature stability and ±3–5% RH stability for consistent results. Use controllers that let you adjust hysteresis and log data so you can tune the system.
FAQ: Is nitrite safe — how much should I use?
When used correctly per supplier instructions and tested recipes, nitrite is a proven tool to control Clostridium botulinum and improve color. Prague Powder #1 contains ~6.25% sodium nitrite; a common maximum dosing is 0.25% of meat weight (2.5 g/kg), roughly 156 ppm nitrite in the final mix. Always follow manufacturer and recipe limits; do not improvise.
FAQ: What sensor specs should I buy?
Choose hygrometers with ±2–3% RH accuracy, replaceable probes, and calibration capability. Look for temperature probes with ±0.5°C accuracy. If you plan remote logging, verify the device stores data locally as well as in the cloud.
FAQ: How do I tell good vs. bad mold?
White, powdery Penicillium nalgiovense on salumi is desirable. Reject items with fuzzy green, black, red or slimy growth; these can indicate contamination or toxigenic molds. Strong ammonia or putrid odors are additional signs of spoilage. When in doubt, discard and investigate your chamber sanitation and RH control.